My little 8lb pup likes to prove he’s faster and more agile than Daddy. The minute we step outside, he likes to rocket around my legs, wrapping my feet in his leash. Walking with him is something of an exercise in extracting myself from his exuberant tangles.
Filming my YouTube videos felt quite similar for quite some time. When I began shooting hands-on YouTube videos, I used a cheap $20 lavalier mic at the end of a 20ft cord connected to my phone. No matter where I went in my workshop or lab, I got tangled up in that cord. Eventually, I invested in a remote wireless microphone system and a dedicated shotgun mic. That was a while ago. Both still work but neither is currently for sale.
Both shotgun and clip-on mics can help you produce YouTube videos and you can probably get away with just one type. But I find that each serves its own purpose. A shotgun mic is far better than just the mic on your camera or phone, but it’s unidirectional. It picks up what it points at. So, for all those YouTube videos you’ve seen where someone seems to be leaning into the camera and talking, that’s often done with a shotgun mic.
The advantages are obvious. You don’t have to string mic cables under your shirt and into either a wireless pack or on a long cable to the filming device. The disadvantage isn’t quite as obvious until you discover it later in post. If you turn away from the camera, the sound quality goes to crap. The farther away and the sharper the angle away, the worse the sound.
That’s where clip-on mics come in handy. As long as you’ve clipped it onto your shirt where it picks up properly, you can move in any direction and the sound will be picked up. You can immediately see why a wireless version of this is so much better — you can walk away, be across the room, turn to do something, and your voice audio quality will remain good — without the cord wrapping itself around your legs like my dog’s leash.
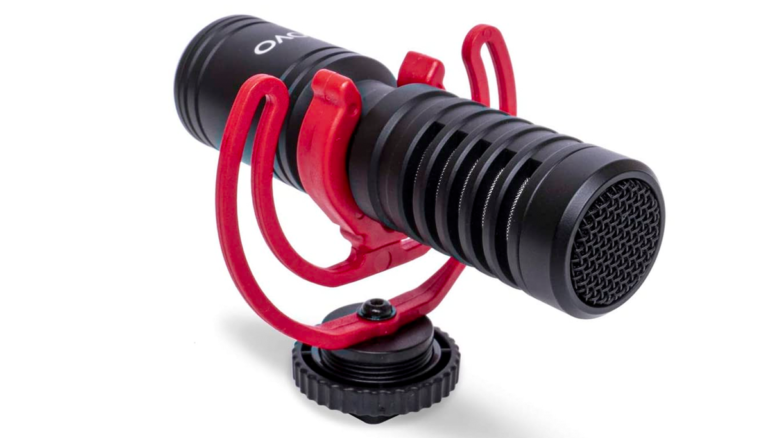
Movo (the photo accessories company, not the mobile payments or the wine distributor) sent me both a remote wireless clip-on mic and a shotgun mic to test. Both are pretty good, but both do have some tradeoffs you’ll need to consider.
Low-cost mini shotgun mic
Let’s start with the shotgun mic. At about 3in long, this is a relatively short distance shotgun mic. It will do pretty well with cameras at arm’s length, but the sound will begin to distort if you get too much farther away than that.
The kit comes with both TRS and TRRS 3.5mm adapters. The TRS (tip, ring, sleeve) adapter will plug the mic directly into most DSLR cameras and many standard audio components. The TRRS (tip, ring, ring, sleeve) is a 3.5mm adapter that is/was used mostly in smartphones.
Note: if you use an iPhone more recent than 2016’s iPhone 7, you will not be able to use this mic without a 3.5mm to Lightning adapter. Such an adapter (about $8 at Amazon) is not included with the $49.95 Movo shotgun mic. You do get both a foam and dead cat windscreen, a case, and a surprisingly effective shock mount in the package.
There is a headphone monitor jack right on the back of the mic, but oddly enough, you can’t use it to monitor what you say into the mic. All it does is allow you to plug something in and listen to it, so it’s basically an extension of your phone’s headphone jack. Movo loses a point or so for this misleading and wacky design decision.
I found that the sound quality was good with smartphones, but less than ideal on DSLRs. To be fair, the DSLRs I tested with have notoriously low-quality audio preamps, but the only way I got identifiable sound was to crank the volume up in post, which led to distorted audio.
Bottom line: If you’re buying for a smartphone with an existing 3.5mm audio jack, this is a no-brainer. Good quality at a good price. If you’re buying for a DSLR, you might not be happy. I used an old iPhone with a 3.5mm jack to record from the Movo and also used the on-camera mic on my DSLR. Then, in post, I synced them as multicam and got a great recording. If you have an iPhone released in the last four years, the need for a round-tip-to-Lightning adapter adds a bit of inconvenience but sound is still good.
Wireless Lavalier
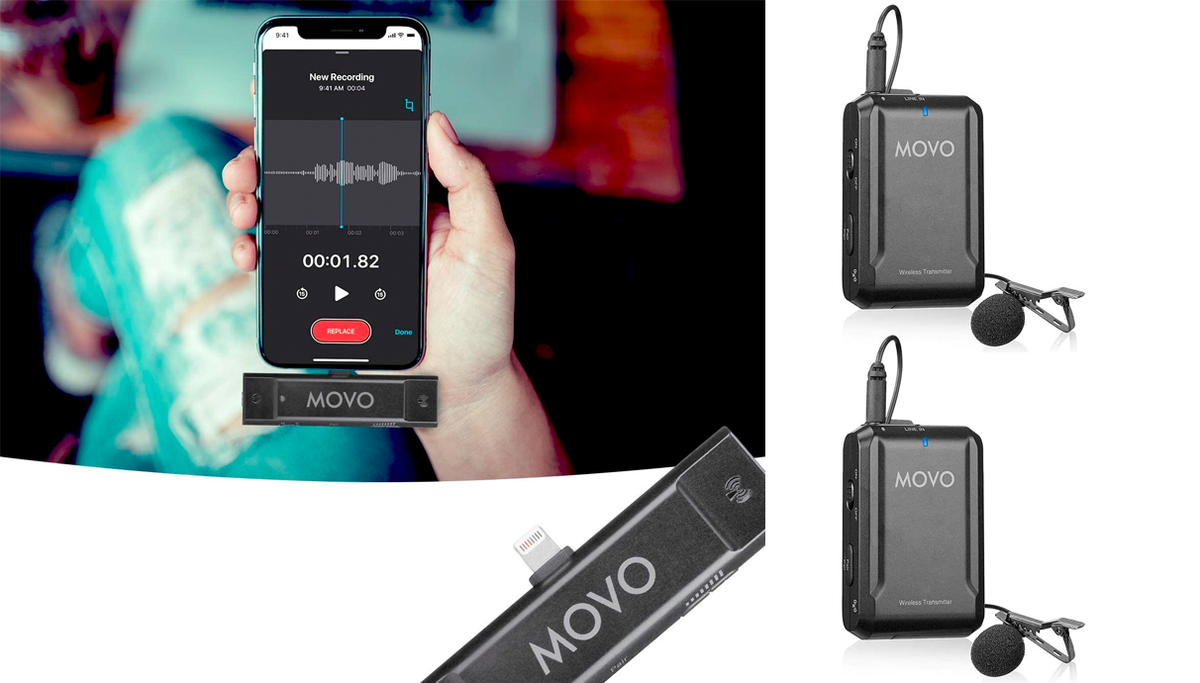
When Apple eliminated the headphone jack from its phones, it immediately obsoleted the 3.5mm mics. Fortunately, vendors like Movo have risen to the occasion and created these sort of specialty mics, but for the Lightning port instead of the 3.5mm jack.
In this section, I’ll show you a solid wireless solution, but before I do, I want to whine for a minute about the elimination of the 3.5mm jack on iPhones. I wrote a long screed about it way back in 2016 when the iPhone 7 was announced. While I’ve come to terms with losing the functionality of that port, there are some disadvantages to Lightning port mics.
The biggest for me is power. The mics increase power consumption. Not by a lot, but when filming I find the phones run out of juice relatively quickly, so having external power is a big win. There are ways, with T-adapters and extension cables, to make it all work. But the complexity can become a bit annoying after a while.
That said, most people aren’t likely to try to spend all afternoon doing 4K multicam recording sessions. For the typical YouTuber doing a short hands-on demonstration, the Lightning connection is quite workable. And with that, let’s talk about this Movo kit.
The first thing I really like about this kit is it comes with two remote mics. My previous remote mic had only one mic and setting up a separate mic required a whole lot of fiddling. Even so, the sound was different from each mic, making post-production difficult. This two mic kit (for $199) makes recording interviews and conversations much easier. In a world where participants need to sit at opposite ends of a room, having two matching remote mic packs is a big help.
There is a lower-cost kit with one mic available for about $139. If you never expect to be face-to-face with any human outside your quarantine pod ever again, this might be a more cost-effective option.
Setup and configuration are easy, but I did have to fiddle a bit initially to get the remote connection to sync. There’s a tiny receiver that attaches at the base of the phone. Each mic transmitter is about the size of an Altoids tin. I found the best approach for me was to clip the mic to my shirt, run the cable down the inside of my shirt to the transmitter, and just put the transmitter in my pocket.
Once I got it working, it was a solid experience — mostly. The wireless connection runs at 2.4GHz, which means it is subject to other wireless signals and to interference. Don’t use it, for example, to record kitchen videos while also operating a microwave. I found that if I used it in a relatively signal-quiet environment, recordings were fine.
But when I tried to record while spinning up a table saw or 3D printer, there was some static if I got too close to the machine. Every so often, the pairing just stopped and I had to find a paperclip in order to reset the pairing and start over.
Bottom line: If you want to record conversations face-to-big-empty-room-area-to-face, and you’re not running a lot of interfering devices, these are quite good for the money. If you’re recording hands-on video and are likely to be using devices that cause radio interference (like kitchen appliances, power tools, or desktop fabrication gear), you may want to look for an alternate solution.
What mics do you use? What gear do you rely on to produce YouTube videos? Let us know in the comments below.
You can follow my day-to-day project updates on social media. Be sure to follow me on Twitter at @DavidGewirtz, on Facebook at Facebook.com/DavidGewirtz, on Instagram at Instagram.com/DavidGewirtz, and on YouTube at YouTube.com/DavidGewirtzTV.


